Your slides look flat. The text sits there, the bullet points stack up, and you watch eyes glaze over halfway through your third slide. Presenters who master multimedia turn passive viewers into engaged audiences, but most people skip audio and video because they assume it’s complicated or time-consuming. It’s not.
Google Slides makes it surprisingly simple to drop audio tracks in and embed videos from YouTube, your hard drive, or Google Drive. You can pull narration together, set playback controls up, and get videos running in minutes.
This guide walks you through everything you need to set up multimedia properly and avoid the common pitfalls that make audio cut out or videos fail to play.
Here’s what we’ll cover:
- Adding audio to your slides
- Inserting video content
- Playback customization that controls start times, volume, and autoplay
- Troubleshooting solutions for audio failures and video errors
Let’s start uploading!
How to Drop Audio Into Your Slides
Embedding audio in your Google Slides presentation lets you lay emphasis on key messages and create a more immersive experience for your audience. Voices, sounds, and music can set the mood up, guide viewers through complex concepts, or provide context that text alone can’t deliver.
You have three main options for getting audio into your slides. You can record your own narration and upload it, pull files from your Google Drive, or link to audio hosted on external URLs. Each method works best in different scenarios, so we’ll break them all down.
Recording and Adding Your Own Narration
Recording your own voice gives you complete control over timing, tone, and delivery. This works particularly well for training presentations, educational content, or any situation where you need to walk viewers through slides at a specific pace.
- Step 1 – Create your audio recording: Use any recording software or app on your computer or phone. Built-in tools like Voice Memos on Mac, Sound Recorder on Windows, or your smartphone’s recording app all work fine. Make sure you’re in a quiet space with minimal background noise. Test your audio levels before recording the full narration to avoid having to redo everything.
- Step 2 – Save the file in a compatible format: Google Slides only accepts MP3 or WAV files. If your recording app saved the file in a different format like M4A or AIFF, you’ll need to convert it first. Free online converters like CloudConvert or Zamzar can handle this quickly. Save the converted file somewhere you can easily locate it.
- Step 3 – Upload your recording to Google Drive: Open Google Drive and click the “New” button, then select “File upload.” Navigate to your saved audio file and upload it. Once the upload finishes, right-click on the file and select “Share.” Change the permissions to “Anyone with the link can view” so your presentation can access the audio properly.
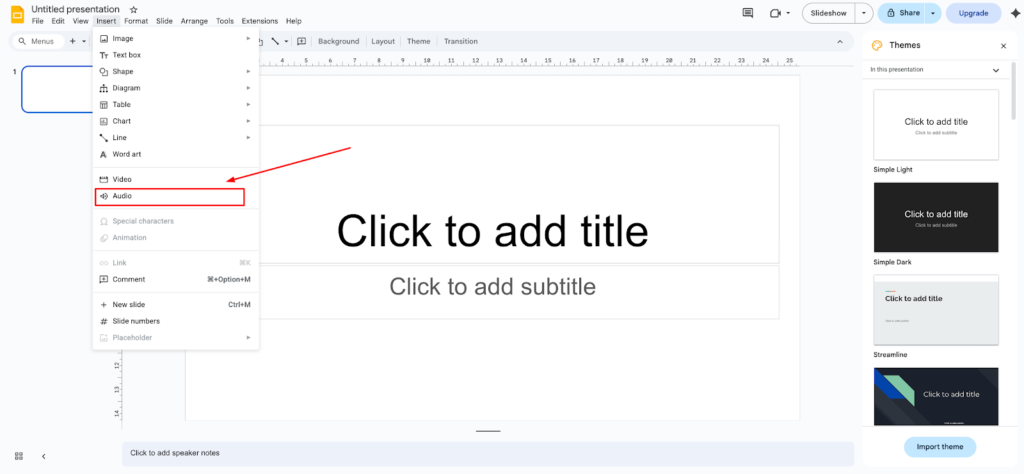
- Step 4 – Insert the audio into your slide: Open your Google Slides presentation and go to the slide where you want the audio. Click Insert in the top menu, then select Audio. A window will pop up showing your Google Drive files. Find your uploaded narration, click on it, and hit Select. The audio will appear as a small speaker icon on your slide.
- Step 5 – Test the playback: Click the speaker icon and press play to make sure the audio sounds clear. You can drag the icon around to position it wherever you want on the slide. Right-click on the icon to access Format options, where you can adjust volume, set autoplay, or choose specific start and stop times.
Pulling Audio Files From Google Drive

If you already have audio files saved in Google Drive, this method saves you time since you skip the upload step. This works great for music tracks, sound effects, or pre-recorded content you’ve been storing in the cloud.
- Step 1 – Verify your audio file format: Before you start, make sure your file is either MP3 or WAV. If it’s not, convert it using an online tool or audio software. Upload the properly formatted file to Google Drive if it’s not already there.
- Step 2 – Set sharing permissions correctly: Locate the audio file in your Google Drive. Right-click on it and choose “Share.” Under “General access,” switch the setting to “Anyone with the link” and make sure it says “Viewer” in the dropdown. This prevents permission errors when your presentation tries to play the audio.
- Step 3 – Open your presentation and navigate to the target slide: Go to Google Slides and open the presentation you’re working on. Click on the specific slide where you want to drop the audio in.
- Step 4 – Access the Insert Audio menu: From the top toolbar, click Insert, then hover over or click Audio. You’ll see your Google Drive files displayed in the selection window.
- Step 5 – Select and place your audio: Browse through your Drive files or use the search bar to locate your audio. Click on the file once to select it, then click the Select button at the bottom right. The audio icon will appear on your slide. You can resize it or move it to any position that works for your layout.
- Step 6 – Configure playback settings: Right-click the audio icon and select Format options from the menu. The sidebar will open on the right side of your screen. Here you can toggle autoplay on or off, adjust volume levels, or set the audio to loop continuously during your presentation.
Linking Audio From External URLs
Sometimes you want to use audio that’s already hosted somewhere online. This method works well for publicly available sound effects, music libraries, or any audio content you don’t want to store in your Google Drive.
- Step 1 – Find the direct audio file URL: You need a direct link to the audio file itself, not a webpage that contains the audio. The URL should end in .mp3 or .wav. Many free sound libraries provide direct download links. Copy the complete URL from your browser’s address bar.
- Step 2 – Open your presentation: Go to Google Slides and open your presentation. Select the slide where you want the audio to appear.
- Step 3 – Insert the audio link: Click Insert from the top menu, then select Audio. You’ll see a tab labeled “By URL” at the top of the pop-up window. Click that tab, then paste your copied URL into the text field. Hit Select to add it.
- Step 4 – Position and format the audio icon: The speaker icon will appear on your slide. Move it to your preferred location and adjust the size if needed. Access Format options through a right-click to control playback behavior.
- Step 5 – Test the connection: Play your presentation in presentation mode to verify the audio loads and plays correctly. External URLs can sometimes fail if the host site goes down or changes the file location, so always test before your actual presentation.
Avoiding Common Audio Problems
Getting audio to play smoothly requires attention to a few technical details. Here’s what you need to keep in mind:
- Stick to MP3 or WAV formats – These are the only two audio formats Google Slides supports. Any other format will fail to play.
- Always run a sound check – Play through your entire presentation at least once before presenting to catch any audio issues early.
- Adjust playback settings after testing – Once you know the audio works, fine-tune the volume, loop settings, and autoplay options in the Format menu.
- Set proper sharing permissions – Files in Google Drive must be set to “Anyone with the link can view,” or the audio won’t play during your presentation.
How to Embed Videos That Actually Play
Videos bring your slides to life in ways static images never could. Demonstrations become clearer, concepts get easier to grasp, and your audience stays focused longer when you show them something instead of telling them about it. You can pull videos directly from your computer’s hard drive or link to content hosted on YouTube. Both methods take less than five minutes once you know the steps.
Uploading Videos From Your Hard Drive
When you have a custom video file saved on your computer, uploading it through Google Drive gives you full control over the content. This works perfectly for company training videos, screen recordings, or any proprietary footage you’ve created.
- Step 1 – Open Google Drive in your browser: Go to drive.google.com and log in to your account. You’ll need to upload your video file here first before you can add it to your presentation.
- Step 2 – Upload your video file: Click the New button in the top left corner of Google Drive. Select File upload from the dropdown menu. A file browser window will open on your computer. Navigate to where your video is saved, select it, and click Open. The upload time depends on your file size and internet speed. Larger videos might take several minutes.
- Step 3 – Verify the upload completed: Once the upload finishes, you’ll see your video file appear in your Google Drive. You can confirm it uploaded correctly by clicking on it to preview. If the video plays in the preview window, you’re ready to move forward.
- Step 4 – Set the correct sharing permissions: Right-click on your uploaded video file and select Share. Under “General access,” change the setting to Anyone with the link. Make sure the permission level shows Viewer. This step prevents permission errors that would stop your video from playing during presentations.
- Step 5 – Open your Google Slides presentation: Go to slides.google.com and open the presentation where you want to add the video. Click on the specific slide that should contain your video content.
- Step 6 – Access the Insert Video menu: From the top toolbar, click Insert and then select Video from the dropdown menu. A pop-up window will appear with several tabs at the top.
- Step 7 – Select your video from Google Drive: Click the Google Drive tab in the pop-up window. You’ll see all your Drive files displayed. Scroll through your files or use the search bar to locate the video you uploaded. Click on the video thumbnail once to select it.
- Step 8 – Insert the video onto your slide: After selecting your video, click the Select button at the bottom right of the pop-up window. The video will appear on your slide as a rectangular frame. You can drag the corners around to resize it or click and drag the entire frame around to reposition it anywhere on your slide.
- Step 9 – Preview the video playback: Click on the video frame and press the play button that appears. Watch a few seconds to confirm the video loads properly, and the quality looks acceptable. If everything checks out, you’re done with this method.
Embedding Videos From YouTube
YouTube hosting saves you storage space in Google Drive and often provides better streaming performance. If your content is already on YouTube or you want to use publicly available videos, this method gets you there faster.
- Step 1 – Navigate to the correct slide: Open your Google Slides presentation and click on the slide where you want the video to appear.
- Step 2 – Open the Insert Video dialog: Click Insert in the top menu, then select Video. The insertion dialog will pop up with multiple tabs across the top.
- Step 3 – Choose your insertion method: You have two options for adding YouTube videos. You can paste a URL directly, or you can search for videos without leaving Google Slides. Pick whichever method works better for your situation.
- Method A – Using a direct URL: If you already have the YouTube video URL, click the By URL tab at the top of the dialog. Open YouTube in another browser tab and find the video you want. Copy the complete URL from your browser’s address bar. Return to Google Slides and paste the URL into the text field. Click Select to add it.
- Method B – Searching within Google Slides: Click the Search tab in the insertion dialog. Type keywords related to the video you want to find. Google Slides will display YouTube search results directly in the dialog window. Browse through the results until you find the right video. Click on the video thumbnail to select it, then click the Select button.
- Step 4 – Position and size your video: The video will appear on your slide in a default size and position. Click and drag it around to move it where you want it. Pull the corner handles out or push them in to make the video larger or smaller. Hold Shift while resizing to maintain the original aspect ratio and avoid distortion.
- Step 5 – Test the video in presentation mode: Click the Present button in the top right corner of Google Slides to enter presentation mode. Navigate to the slide with your video and try playing it. This confirms the video loads correctly and helps you spot any playback issues before your actual presentation.
Supported Video Formats and Limitations
Google Slides works with most common video formats, but knowing the specifics helps you avoid frustration.
- Supported formats for uploaded videos – WebM, AVI, MPEG4, MP4, FLV, VMV, MOV, and WMV all work when uploaded through Google Drive
- YouTube videos play through embedded players – These don’t count against your Google Drive storage quota
- File size affects upload time – Videos over 100MB can take considerable time to upload, depending on your connection speed
- YouTube videos require internet access – Unlike uploaded files, YouTube embeds won’t work offline
Dialing Your Playback Settings In
Once you’ve added audio or video to your slides, the default playback settings might not match what you need. Google Slides gives you granular control over when media starts, how loud it plays, and what happens when viewers reach that slide.
- Accessing the Format Options menu: Click on your audio or video element to select it. Right-click and choose Format options from the menu. A sidebar will open on the right side of your screen with expandable sections.
- Start and stop times: You don’t always need the entire audio track or video clip. Click the Video playback or Audio playback section to expand it. Enter specific timestamps in the “Start at” and “End at” fields. This lets you trim content without editing the original file. A 5-minute video can become a focused 30-second clip that shows exactly what you need.
- Volume controls: Use the volume slider to adjust how loud your media plays. Drag it left to lower the volume or right to increase it. This becomes critical when you plan to talk over a video or when background music should stay subtle behind your narration.
- Autoplay settings: Toggle the “Autoplay when presenting” option to make your media start automatically when you reach that slide. Turn it off if you want manual control over when the playback begins. This gives you the flexibility to introduce the content verbally before starting it.
- Mute options for video: You can mute a video’s audio track entirely while keeping the visuals. This works well when you want to narrate over footage or when the video serves a purely visual purpose.
- Loop functionality: Enable the loop option to make audio or video repeat continuously. Background music or ambient sounds benefit from this setting, creating an atmosphere without requiring you to restart playback manually.
Fixing Common Playback Failures
Media that won’t play during your presentation can derail your entire flow. Most playback problems stem from a handful of common issues that take minutes to resolve.
- Audio Troubleshooting
- Format compatibility errors: Google Slides only accepts MP3 and WAV audio formats. If your audio to Google Slides won’t insert or play, check the file extension. Convert any other formats using free online tools like CloudConvert or desktop software like Audacity. After conversion, add audio files to your existing presentation document and try again. Make sure you’re using high-quality audio files to maintain sound quality throughout your presentation.
- Permission problems: Files stored in Google Drive must have correct sharing settings. Right-click your audio file in your Google Drive account and select Share. Change “Restricted” to “Anyone with the link” with Viewer permissions. Private files won’t play audio during presentations, even if you uploaded your own audio. You can add audio to Google presentations from Drive, Apple Music, or add Spotify songs as long as the file format is compatible.
- Broken URL links: Audio inserted via URL depends on the host site staying online. If a URL-based audio track stops working, the source might have moved or deleted the file. Download the audio and upload it to your Google Drive instead for reliable playback. You can add music or add background music using separate tracks for better control.
- Audio settings and controls: Access the playback menu by right-clicking on your audio element. Check the audio volume levels and playback options from the drop-down menu that appears. Enable loop audio if you need continuous playback, or toggle play automatically to start the track when you reach that slide. Use the menu bar to access additional audio settings for fine-tuning.
- Video Troubleshooting
- Unsupported video formats: Videos in formats like MKV or OGV won’t work in Google Slides. Convert them to MP4, WebM, or AVI before uploading. Most video editing software and free online converters can handle this quickly. Be mindful of video file size as larger files take longer to upload and may affect playback performance.
- Internet connection issues: Both Google Drive videos and YouTube embeds need internet access to stream. If videos buffer endlessly or won’t load, check your connection speed. For presentations in areas with unreliable internet, download your slides for offline viewing through File > Make available offline. Check the thumbnail preview to confirm your video has been uploaded correctly.
- YouTube playback restrictions: Some YouTube videos have embedding disabled by the uploader. Copy the YouTube link and try inserting it through the new browser tab method. You’ll get an error message when trying to insert these if embedding is blocked. Look for alternative videos or contact the content owner to request embedding permissions. Add voice narration separately if the video audio doesn’t meet your needs.
- Cache and browser problems: Clear your browser cache if videos worked previously but suddenly fail. Sign out of Google Slides, clear your cache, and sign back in. Try a different browser if problems persist.
Keeping Your Multimedia Focused
Multimedia enhances presentations when used strategically, but too much turns engagement into a distraction. The goal is to support your message, not overshadow it.
- Use multimedia with purpose: Every audio clip or video should serve a specific function. Ask yourself what each piece of media accomplishes that text or images can’t. If you can’t articulate a clear reason, remove it. Your slides will have more impact with fewer, well-chosen elements that highlight your key points.
- Limit multimedia per slide: One audio element or one video per slide keeps things digestible. Multiple competing media sources split your audience’s attention and make it harder for them to absorb your main points. Save additional content for subsequent slides. Place your speaker button in a general location that doesn’t interfere with other slide elements.
- Keep clips brief: Long videos or audio tracks test your audience’s patience. Aim for 30-90 seconds maximum unless the content is exceptionally compelling. Use the start and stop time controls to trim longer files down to their most relevant sections.
- Don’t put multimedia on every slide: Strategic breaks from multimedia give your audience time to process information. Alternate between media-rich slides and simpler text or image slides. This creates a natural rhythm that maintains interest without causing fatigue. Plan your slide change timing to give viewers enough time to absorb each multimedia element.
- Match quality to context: Low-resolution videos or audio with background noise damage your credibility. If you can’t source or create high-quality media, skip it. A clean slide with clear text beats grainy footage or muffled audio every time.
- Test before presenting: Run through your entire presentation at least once before the actual event. Check that media loads properly, volume levels sound appropriate, and timing works as expected. Fix any issues while you still have time.
Making Your Slides Accessible
Accessibility features help everyone in your audience engage with your content, regardless of their abilities or preferences.
- Alternative text for visual elements: Screen readers can’t interpret images or video thumbnails without text descriptions. Right-click on any image or video frame and select Alt text from the editing options. Write a brief description that explains what the visual shows. Someone using a screen reader will hear this description and understand the content’s purpose. You can also select insert from the toolbar to access these options.
- Captions for video content: Captions make videos accessible to people who are deaf or hard of hearing. They also help viewers in noisy environments or those who prefer reading along. YouTube videos often include auto-generated captions you can edit for accuracy. For uploaded videos, add narration or captions through video editing software before uploading to your drive screen.
- Transcripts for audio: Provide written transcripts of any narration or audio content. You can add these as speaker notes in Google Slides or include them in a separate document linked from your presentation. Transcripts serve people with hearing impairments and give everyone a reference they can review later.
- Sufficient color contrast: Text overlaid on images or videos needs enough contrast to remain readable. Dark text on light backgrounds or light text on dark backgrounds works best. Avoid placing text over busy video scenes where it becomes hard to read.
- Keyboard navigation support: Some users navigate presentations using only keyboards. Test your slides using Tab and Enter keys to confirm all interactive elements are accessible without a mouse. This includes video play buttons and audio controls.
Your Slides Are Ready for Showtime
You’ve got the tools to transform flat presentations into engaging multimedia experiences. Audio narration guides viewers through complex topics, videos demonstrate concepts that words can’t capture, and proper playback settings keep everything running smoothly during your actual presentation.
Here’s what you can do now that most presenters can’t:
- Embed three types of audio into any slide using recorded narration, Google Drive files, or URL-based tracks that play exactly when you need them
- Pull videos in from your hard drive or YouTube and position them anywhere on your slides with full control over sizing and placement
- Set playback controls up to trim content to specific timestamps, adjust volume levels, enable autoplay, and loop background audio without manual restarts
- Fix common failures by converting files to supported formats, correcting Drive permissions, and troubleshooting connection issues before they disrupt your presentation
- Keep multimedia strategic by limiting one element per slide, trimming clips to 30-90 seconds, and using high-quality files that support your message instead of distracting from it
- Make content accessible through alt text descriptions, video captions, audio transcripts, and proper color contrast that helps every viewer engage with your material
The difference between a forgettable presentation and one that sticks comes down to how well you communicate your ideas. Multimedia gives you more ways to reach your audience, but the mechanics need to work flawlessly when you’re standing in front of people.
If you plan to run these Google Slides presentations on digital signage displays in lobbies, conference rooms, or public spaces, you’ll need a system that handles multimedia reliably across multiple screens. CrownTV’s digital signage platform plays your Google Slides presentations with full audio and video support, so the engaging content you’ve created actually reaches your audience the way you intended.